Welcome to Day 5 of our #XmasAmiCAL! Today, we’re excited to share with you a fun and festive crochet project – Santa’s boots.
Day 1: Santa’s boot Ornament
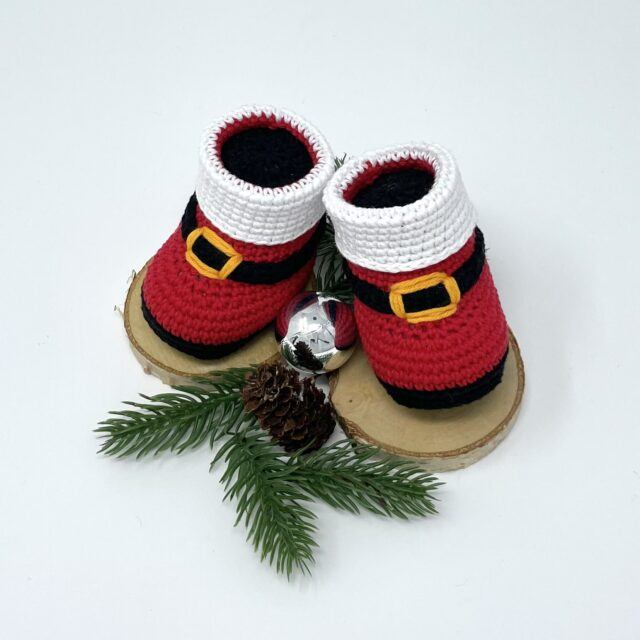
This charming Christmas ornament is a delightful addition to your holiday decorations. With a bit of patience and a few simple crochet techniques, you can create your very own pair of Santa’s boots. Let’s get started!
Santa’s boot Christmas ornament amigurumi pattern
Abbreviations
Before we dive into the pattern, let’s familiarize ourselves with the crochet abbreviations that are going to be used in this tutorial:
R – round/row
sc – single crochet
inc – increase (2 sc in same stitch)
dec – invisible decrease
ch – chain stitch
slst – slip stitch
bpsc – back post single crochet
BLO – back loop only
FLO – front loop only
st (sts) – stitch (stitches)
[…] – repeat instructions within […]
(…) – total number of sts per round
These abbreviations are common in most crochet patterns and mastering them will make it easier for you to follow along and enjoy the process of creating your Christmas ornaments.
Materials Needed
For this project, we will need the following materials:
- Yarn: Cotton 8/4
- Crochet Hook: Size 2.5 mm
- Stuffing (fiberfill)
- Markers, needle and scissors
Now that we have gathered our materials and understood the abbreviations we are going to be using, let’s dive into the pattern.
The pattern
Our Santa’s boot is created by working in rounds, starting with black yarn. The pattern instructions are as follows:
With black yarn and working in rounds.
R1: ch 12, sc in 2nd chain from hook, 11 sc, working on the other side of the chain make 11 sc (22)
R2: inc, 9 sc, 2 inc, 9 sc, inc (26)
R3: sc, 2 inc, 7 sc, 2 inc, 2 sc, 2 inc, 7 sc, 2 inc, sc (34)
Fasten off
R4: 2 sc, 2 inc, 9 sc, 2 inc, 4 sc, 2 inc, 9 sc, 2 inc, 2 sc (42)
R5: 3 sc, 2 inc, 11 sc, 2 inc, 6 sc, 2 inc, 11 sc, 2 inc, 3 sc (50)
R6: bpsc in all (50)
R7: BLO sc in all (50)
Change to red yarn.
R8: BLO sc in all (50)
R9-11: sc in all (50)
R12: 16 sc, 10 dec, 14 sc (40)
R13: 20 sc, dec, 18 sc (39)
R14: 19 sc, dec, 18 sc (38)
R15: 19 sc, 2 dec, 15 sc (36)
R16: 17 sc, 2 dec, 15 sc (34)
R17-22: sc in all (34)
R18: FLO sc in all (34)
R19: sc in all (34)
Fasten off
With black yarn and working in rounds, pull a loop in any of the back loops of row 18.
R1: sc in all (34)
Stuff
R2: dec in all (17)
R3: 8 dec, sc (9)
Close off and weave in ends.
With white yarn and working in rounds, pull a loop into the last stitch of row 19 so that the right side is on the inside of the boot.
R1-8: sc in all (34)
Fasten off and fold out.
Finishing Touches
Finally, we will add the Santa’s boot belt to give it a complete look. Here are the steps:
Belt
With black yarn.
R1: ch 40, turn (40)
R2: sc in 2nd ch from hook, sc in all (39)
Fasten off and sew around the boot between rounds 13 and 15.
With orange yarn, embroider the belt buckle. It is approximately 5 stitches wide.
Your very own Santa’s boot Christmas ornament is ready to be hung on your Christmas tree or gifted to a loved one.
If you enjoyed this tutorial, stay tuned for more exciting and creative crochet projects from Nordic Handmade. Happy crocheting and Merry Christmas!
Please note, this pattern is for personal use only. Do not distribute, sell, or repost without permission. You are welcome to share the link to this post with friends and family!

Leave a Reply