Christmas is a time of joy, celebration and creativity. One of the most exciting parts of the festive season is the decoration. And what could be more special than handmade Christmas ornaments?
Day 6: Christmas Bear Ornament
Today, I bring you an adorable patterns as part of our XmasAmiCAL. Let’s get started!
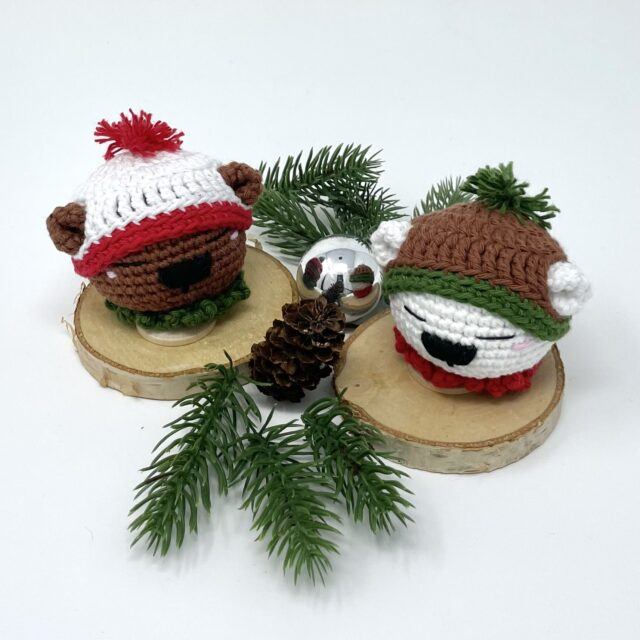
Christmas bear ornament amigurumi pattern
Materials Needed
Before we begin, let’s gather our supplies. For this crochet project, you would need the following:
- Yarn: Cotton 8/4
- Crochet Hook: Size 2.5 mm
- Stuffing (fiberfill)
- Markers, needle and scissors
Abbreviations
If you’re new to crocheting, here are some abbreviations you need to know:
R – round/row
sc – single crochet
inc – increase (2 sc in same stitch)
dec – invisible decrease
ch – chain stitch
slst – slip stitch
dc – double crochet
BLO – back loop only
st (sts) – stitch (stitches)
[…] – repeat instructions within […]
(…) – total number of sts per round
Now that you’re familiar with the abbreviations, let’s dive into the pattern.
The pattern
The first part of the bear ornament we will be creating is the head. Follow these instructions:
R1: 6 sc in magic ring (6)
R2: inc in all (12)
R3: [sc, inc] x 6 (18)
R4: [sc, inc, sc] x 6 (24)
R5: [3 sc, inc] x 6 (30)
R6: [2 sc, inc, 2 sc] x 6 (36)
R7: [5 sc, inc] x 6 (42)
R8-14: sc in all (42)
R15: [5 sc, dec] x 6 (36)
R16: [2 sc, dec, 2 sc] x 6 (30)
R17: [3 sc, dec] x 6 (24)
Stuff
R18: BLO [sc, dec, sc] x 6 (18)
R19: dec in all (9)
Fasten off
Adding the Nose and Ears
Now that the head is ready, it’s time to add details. Let’s start with the nose. With black yarn, embroider the nose between rounds 11 and 14 by forming a triangle upside down.
Next, we create the ears.
R1: 6 sc in magic ring (6)
R2: inc in all (12)
R3: [sc, inc] x 6 (18)
Fasten off. Flatten and fold so it forms a curved shape.
Sew to head between rounds 6 and 10, approx. 14 stitches apart.
Finishing Touches: Eyes and Cheeks
Our bear is almost ready. It just needs some final details. To give life to our bear, embroider eyes between round 10 and 11. And for a bit of color, embroider cheeks between round 11 and 12.
Hat
No Christmas ornament would be complete without a festive hat. Here is the pattern for the bear’s Christmas hat:
Beginning ch 2 does not count as double crochet.
R1: [ch 2, 12 dc] in magic ring, slst in first dc (12)
R2: ch 2, [2 dc in same st] x 12, slst in first dc (24)
R3: ch 2, [dc, 2 dc in same st] x 12, slst in first dc [36]
R4: ch 3, 9 tr, skip 2 sts, ch 3, 12 tr, skip 2 sts, ch 3, 11 tr, slst in first tr (38)
Change to accent color.
R5: ch 1, BLO 38 sc, slst in first sc (38)
R6: ch 1, BLO 38 sc, slst in first sc (38)
Final Additions: Pom Pom and Collar
The final steps involve making a small Pom Pom and sewing it to the top of the hat.
Then, with red yarn, pull up a loop in any of the front loops of R18 from the head, and follow the pattern for the collar:
R1: [ch 4, slst in next] x 24 (24 ch4)
Your own handmade Christmas Bear Ornament. Happy crocheting!
Please note, this pattern is for personal use only. Do not distribute, sell, or repost without permission. You are welcome to share the link to this post with friends and family!

Leave a Reply