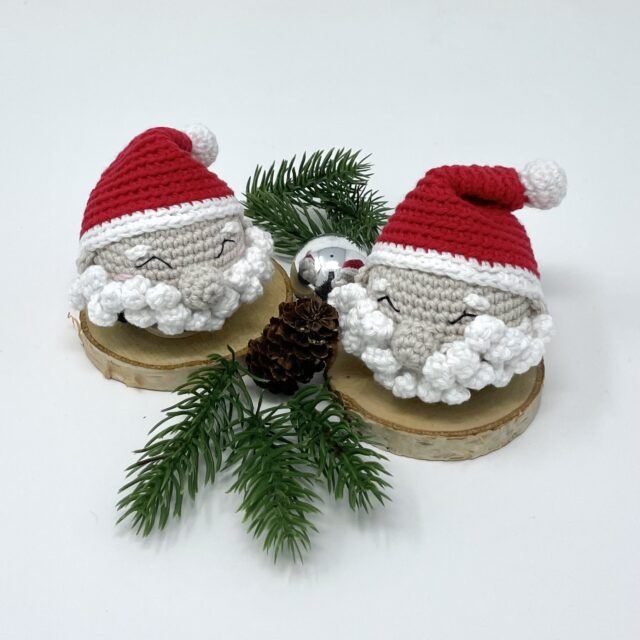
Christmas is the season of joy, love, and handmade decorations! There’s something truly magical about crafting your own festive ornaments. In this blog post, I’ll be sharing a free pattern to create a charming Santa Claus ornament.
Day 9: Santa Claus Ornament
This delightful ornament is part of the #XmasAmiCAL day 9 challenge. So, grab your crochet hooks and let’s dive into the world of Christmas crafting!

Santa Claus ornament amigurumi pattern
Materials Needed
Before we start, make sure you have all the necessary materials at hand. Here’s what you’ll need:
- Cotton 8/4 Yarn
- Crochet Hook: Size 2.5 mm
- Stuffing (fiberfill)
- Markers, needle and scissors
Abbreviations
To read the pattern correctly, you’ll need to understand the abbreviations used. Below is a quick guide:
R – round/row
sc – single crochet
inc – increase (2 sc in same stitch)
dec – invisible decrease
ch – chain stitch
slst – slip stitch
BLO – back loop only
st (sts) – stitch (stitches)
[…] – repeat instructions within […]
(…) – total number of sts per round
French knot
The pattern
Now that we have all the basics covered, let’s start crafting the Santa Claus ornament.
Head
Start with beige yarn and follow the instructions:
R1: 6 sc in magic ring (6)
R2: inc in all (12)
R3: [sc, inc] x 6 (18)
R4: [sc, inc, sc] x 6 (24)
R5: [3 sc, inc] x 6 (30)
R6: [2 sc, inc, 2 sc] x 6 (36)
R7: [5 sc, inc] x 6 (42)
R8-14: sc in all (42)
R15: [5 sc, dec] x 6 (36)
R16: [2 sc, dec, 2 sc] x 6 (30)
R17: [3 sc, dec] x 6 (24)
Stuff
R18: BLO [sc, dec, sc] x 6 (18)
R19: dec in all (9)
Fasten off
Facial details
Next, we’ll create Santa’s nose with beige yarn and his ears.
Nose
R1: 5 sc in magic ring (5)
R2: inc in all (10)
R3: sc in all (10)
Fasten off
Ears (make 2)
R1: 4 sc in magic ring (4)
Remember to sew the nose to face between round 10 and 14 and attach the ears between rounds 10 and 13, approximately 9 stitches from the nose.
Eyes and Cheeks
With the head ready, move on to embroidering Santa’s eyes in round 10 and his rosy cheeks between round 11 and 12.
Browns (make 2)
With white yarn, chain 3 and sew in top of the eyes.
Beard
Now let’s move on to Santa’s iconic beard. You’ll create this with white yarn.
R1: ch 25 (25), place a stitch marker in last chain.
R2: ch 6, sc in 2nd ch from hook, 5 sc, slst in next st from row 1 (11)
R3-R25: repeat row 2
Fasten off and sew row 1 to head from ear to ear and below the nose.
Hat
The Santa ornament wouldn’t be complete without his signature red hat! Starting with red yarn, follow the instructions:
R1: 6 sc in magic ring (6)
R2: inc in all (12)
Working on back loops only the rest of the rounds.
R3: [sc, inc] x 6 (18)
R4: 18 sc [18]
R5: [sc, inc, sc] x 6 (24)
R6: 24 sc (24)
R7: [3 sc, inc] x 6 (30)
R8: 30 sc (30)
R9: [2 sc, inc, 2sc] x 6 (36)
R10: 36 sc (36)
R11: [5 sc, inc] x 6 (42)
R12-15: 42 sc (42)
Change to color white.
R16-17: sc in all (42)
Finally, create a bobble with white yarn:
R1: 6 sc in magic ring (6)
R2: inc in all (12)
R3: [sc, inc] x 6 (18)
R4: [sc, dec] x 6 (12)
R5: dec in all (6)
Fasten off and sew it to Santa’s hat.
Collar
With black yarn, pull up a loop in any of the front loops of R18 from head.
R1: [ch 4, slst in next] x 24 (24 ch4)
And there you have it – a handmade Santa Claus ornament! This festive project is perfect for crocheting enthusiasts and those who love a good DIY Christmas decoration. Remember, handmade ornaments add a unique, personal touch to your Christmas tree. So why not give it a try and create your own Santa Claus ornament? Happy crafting and Merry Christmas!
Please note, this pattern is for personal use only. Do not distribute, sell, or repost without permission. You are welcome to share the link to this post with friends and family!

Leave a Reply